Sunday, October 25, 2015

Rustic Fall Centerpiece

Now that fall is truly here in the northwest, I decided that I needed to make a fun centerpiece.

Centerpiece


I decided I wanted to use some old cedar fence boards to make the box.
Measurements I used:
3 boards @ 8" x 13" - for the sides & bottom
2 boards @ 8" x 5 3/8. - for the ends


We used a table saw to cut the boards so they were smooth cuts.


My hubby helped by using his pocket hole jig to put it together.


This is the cedar box when it was finished.


Now the fun part!

I thought it would be fun to add lace to the box to dress it up a bit, but I used double sided tape so that it wasn't permanent.


The box was fairly deep, so I put some foam and crumpled up some paper bags to make it shallower.


Next, I added some spanish moss.


Then, I put in the pitcher vase and added some fun pumpkins we grew in our garden this year!


Lastly, I added all the fun leaves to fill it in.


I love the natural rustic colors of fall!


What are you using to decorate for fall?


Thanks so much for stopping by!
post signature

Be sure to visit these fun link up parties!

Mad Skills
Show & Tell Link Party
Inspire Me Monday
Lou Lou Girls Fabulous Party
Tutorials & Tips Link Party
Create, Link, Inspire
Creative Muster
Moonlight & Mason Jars
Work It Wednesday
Share Your Cup
Lovely Little Link Party
Celebrate It Block Party
Link Party Pazlooza
The Wednesday Round Up
Flaunt It Friday
DIY Sunday Showcase

Sunday, October 18, 2015

Halloween Cameo Votive

I love cameos.  I picked up a skeleton cameo and had to make something for Halloween this year!

Cameo


I really like the purple and black combination for Halloween - to me it makes it a little more classy!


What you will need:
Vase / Votive holder
Scrapbook paper
Skeleton Cameo - I bought mine off ebay
Filigree
Ribbon / Trim
Hot Glue


First measure and cut the scrapbook paper to fit around the vase.  Leave enough for a slight overlap.  Then wrap the paper around the vase and glue the ends together, overlapping slightly.


Next, cut the ribbon to fit around the vase and glue it down.


Then add a second ribbon or trim if you like.


Lastly, add the skeleton cameo filigree.  ( I didn't get a picture of when I glued the skeleton cameo to the filigree.)


So simple & easy, but it's a great look - for a touch of Halloween!


Thanks so much for stopping by!
post signature

Be sure to check out these fun link up partyies!
Mad Skills
Inspire Me Monday
Show & Tell Link Party
Lou Lou Girls Fabulous Party
The Wednesday Round Up
Share Your Cup
Lovely Little Link Party
Home Matters Link Party
Celebrate It Block Party
Flaunt It Friday
Link Party Palooza
Diy Sunday Showcase

Sunday, October 11, 2015

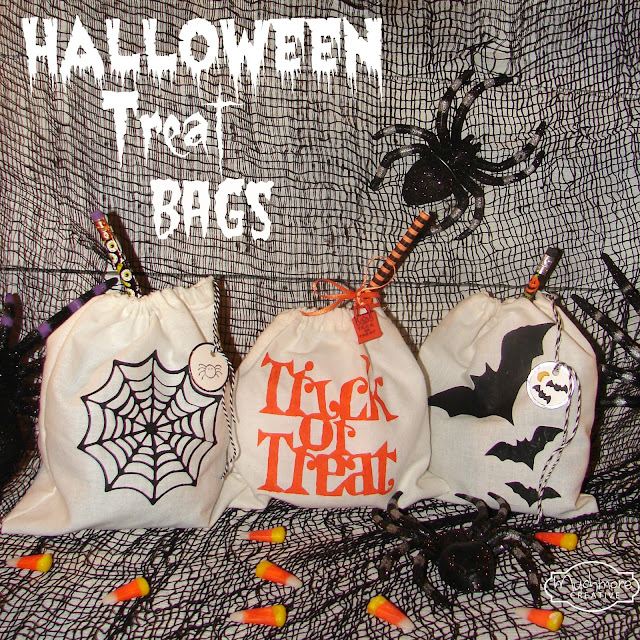
Halloween Treat Bags

My kids are starting to get excited for Halloween and getting in the holiday spirit, so I thought I would to do something fun for them.  I decided to make treat bags.

Treat Bags


What you will need:
Muslin material
Stencil
Paint
Sewing Machine with thread & scissors
Baker's Twin, yarn, or ribbon for the drawstring

First thing I did was cut a couple vinyl Halloween stencils with my Cricut and used transfer tape to stick them to the Muslin fabric.  You don't need a Cricut, you could use any stencil you have.


Next, I painted the stencils using acrylic paint mixed with a textile medium.  (The textile medium helps when painting on fabric)


After the paint was dry, I peeled up the vinyl stencil.


This is what it looked like after:


Then I trimmed the fabric to the size that I wanted the bag to be.  I trimmed mine to 7 1/2 inches wide by 17 inches long.  When the fabric is folded in half it makes a bag that's 7 1/2 inches by 8 1/2 inches.


Next, I folded one end of the fabric over about 1/2 inch (toward the center of the bag) and pressed with an iron. Then, I folded it over 1/2 inch again and pressed - this forms the casing for the drawstring. Repeat on the other end of the fabric.


Then, I sewed along the bottom of the casing on the wrong side of the fabric.  I used the inside of my pressure foot as a guide. Make sure to sew each casing separately.  Don't forget to back stitch!


Next, I sewed the side seams with the right sides of the fabric together - remembering to stop right before the casing so not to sew it closed. 


This is what is looks like after it is sewn.


Then, I used a safety pin to pull the baker's twin through the casing to make the drawstring.


Lastly, fill the bags with whatever fun things you like!


Thanks so much for stopping by!

 post signature

Be sure to check out these fun link up parties!
Share Your Cup

Sunday, October 4, 2015

Halloween Display Pedestals


I have been wanting to make a set of black display pedestals and I thought they would be perfect for Halloween decor.


What you will need:
Candlesticks
Various wood pieces
Cloche
Paint
Sand paper
E6000


I started out with candlesticks, a cloche, and variety of wood pieces.


I spray painted the different pieces with black spray paint.


After the paint was dry, I sanded the pieces a bit to rough them up.


I used E6000 to glue the different pieces together.


Finally, I added all the decor!


What are you making for Halloween?


Thanks so much for stopping by!
post signature

Be sure check out these fun link up parties!

Mad Skills
Lou Lou Girls Fabulous Party
Create, Link, Inspire
Tutorials & Tips Link Party
Creative Muster
Work It Wednesday
Lovely Little Link Party
Flaunt It Friday
Link Party Palooza
DIY Sunday Showcase
Share It One More Time
Moonlight & Mason Jars