Saturday, May 30, 2015

Wrench Frame


I wanted something a little unusual for Father's Day this year, so I came up with a rustic wrench frame.


What you will need:
4 Wrenchs - mine were all close to the same size.
1 Large bolt
Paint
Epoxy or glue
Cardboard


First, arrange the wrenches how you would like them for the frame.


I was going to use epoxy to hold the wrenches together, but my handy husband thought the frame would be more sturdy if he welded them together, so they are welded.


So, here is the tricky part - if you don't have a welder, it would be hard to attach the bolt to the back, so you could put it on an easel - I took a picture of it before the bolt was welded.


Then, spray paint the frame until you like the color.


I used some epoxy on the top and bottom of a piece of cardboard and attached it to the frame.  This makes a pocket for you to slide your picture in.


I guess my husband won't be suprised, because he helped, but I still think I makes a nice gift!

What are you doing for Father's Day this year?

Thanks for stopping by!

post signature

Be sure to check out these fun link up parties!

Saturday, May 23, 2015

Vintage Window


I have been keeping my eye out for an old wood panel window to create this project.  One day I was talking to my neighbor and mentioned I was looking for one, and he said that he happened to have an old window.  He said he would trade me the window for some of his favorite treat, some delicious banana bar.  What a deal!

old panel wood window


Here is what you will need:
An awesome old window
Paint
Chalkboard Vinyl
Chalkboard Design


I painted my window, because even after I scrubbed it there were still dirt spots on it.


Then I sanded it to make it look more aged.


I painted the sides of the window gray so it would give it a bit more dimension.


Next, I cut the vinyl to fit each window and applied it to the windows.


Lastly I added the chalkboard design.  I have a tutorial HERE on how I do my chalkboard designs.

I do quite a few project for work and for other people, but I am putting this one up on the wall at my place!


Thanks for stopping by!
post signature

Be sure to check out these fun link parties!
DIY Sunday Showcase
Much Ado About Monday
Mad Skills
Lou Lou Girls Fabulous Party
Create Link Inspire
Tutorials & Tips Link Party
Inspire Me Monday
Totally Talented Tuesday
Show and Tell Link Party
Creative Muster
Share Your Cup
Work It Wednesday
The Wednesday Round Up
Crafty & Delicious Party
Lovely Little Link Party
Flaunt It Friday


Saturday, May 16, 2015

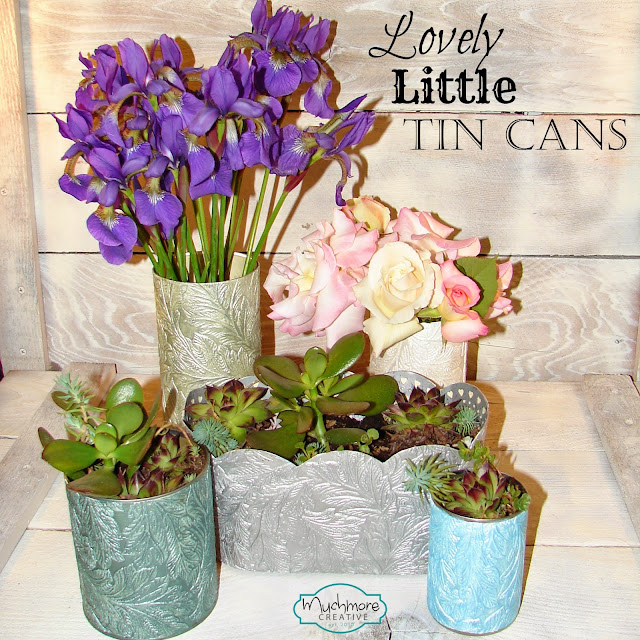
Lovely Little Tin Cans

I have lots of plants in and around my house and I have been loving all the succulents I have been seeing, so I wanted to try a little something different with the container.

Wallpaper Vases


What you will need:
Tin cans, vases, or any fairly flat container
Paintable wallpaper
Modge podge
Paint
Brush
Ruler


First, measure your container so you know what size to cut the wallpaper.


Next, cut your wall paper to fit your container.


Modge podge the can and add the wallpaper.


This is what they should look like...


Then, paint the wallpaper whatever color you like.  I used some acrylic metallic paints.  I liked the white pattern on the wallpaper but it was to dull looking, so I painted it with a metallic green color so it had more depth.


I made several other cans and painted them different colors.  To fill the cans I picked some flowers from my yard and repotted some of my succulents and this is how they turned out!


I really like the wallpaper over the glass vase, what is your preference?

Thanks for stopping by!

post signature

Be sure to check out these fun link up parties!

Share It One More Time Saturday
DIY Sunday Showcase
Found & Forged Link Party
Much Ado About Monday
Mad Skills
Show and Tell Link Party
Lou Lou Girls Fabulous Party
Inspire Me Monday
Totally Talented Tuesday
Create, Link, Inspire
Do Tell Tuesday
Tutorials & Tips Link Party
Creative Muster
Share Your Cup
Work It Wednesday
The Wednesday Round Up
Crafty & Delicious Party
Lovely Little Link Party
Flaunt It Friday


Saturday, May 9, 2015

Anchor's Aweigh

I love the nautical look.  I was putting a nautical display together for a work project, and I couldn't resist making a pallet anchor.

Anchor Pallet


What you will need:
Wood Pallet
Wood Glue
Anchor Stencil
Paint
Hot Glue Gun
Rope or Jute


First, cut the boards from the wood pallet to the length you prefer.  I cut my 14 inches long.


Next, you will want to fasten the pieces of wood together.  I was going to glue mine together, but my handy husband suggested something a bit more sturdy.  He used his pocket hole jig to screw the boards together.


I used my cricut to cut an anchor pattern, but a cricut is not required, any stencil will work for this.


Stick the stencil to the boards and paint in the anchor.


 Next, decide where you want your rope and hot glue it on.


It should look something like this:


Next, drill holes in the board were you want your rope to go through, then thread it through and tie a knot.  I threaded mine through from the backside so the knot is on the front side.


I really like how rustic it turned out.


This is the table part of the display.


What is your favorite nautical look?

Thanks for stopping by!

post signature

Be sure to check out these fun link up parties!
Saturday Sparks
Share It One More Time Saturday
DIY Sunday Showcase
Found & Forged Link Party
Oh! That DIY Party
Mad Skills Party
Inspire Me Monday
The Art of Home Making Mondays
Show and Tell Party
Tutorials & Tips link Party
Totally Talented Tuesday
Lou Lou Girls Fabulous Party
Do Tell Tuesday
Share Your Cup Thursday
Create It Thursday
Work It Wednesday
The Wednesday Round Up
Celebrate It Block Party
Flaunt It Friday
Friday Feature Link Party
Link Party Palooza


Featured at:
CraftyAllie


Saturday, May 2, 2015

Where Are Your Keys?

Have you every needed to be somewhere in the next 15 minutes and you're frustrated because you can't find your keys when you just know you left them on the desk and they seem to have grown legs and walked off?

Well, I found a a solution.  A cute key holder!

Where Are Your Keys

What you will need:

Cabinet Door - I found mine at Habitat for Humanity for about $1
Paint - I used Spray paint
Wood Glue
Ruler
Faux Glaze
Wood spindle or knob
Key - I bought mine at Micheals


First, measure and mark where you want the knobs.


Next, drill the holes and glue the knobs in the them.


Next, paint it and let it dry.  I wanted mine to look a bit rustic, so I sanded it a bit.


Next, make sure you wipe off the dust if you want to apply a sealer or faux glaze.


I have really liked the look of the faux glaze as a finish on my wood projects.


Lastly, glue the key on with E600 and you are ready to hang it!


Never worry about frantically trying to find your keys again!


Where do you keep your keys?

Thanks for Stopping by!
post signature

Be sure to check out these fun link up parties!

Share It One More Time Saturday
Found & Foraged Link Party
DIY Sunday Showcase
Silver Pennies Sunday
Oh! That DIY Party
Frugal Crafty Home Blog Hop
Much Ado About Monday
Mad Skills
Something To Talk ABout
Show and Tell Party
Inspire Me Monday
Tutorials & Tips Link Party
Totally Talented Tuesday
Create, Link, Inspire
Lou Lou Girls Fabulous Party
Worthwhile Wednesday
Creative Muster
The Wednesday Round Up
Share Your Cup
Work It Wednesday
Crafty & Delicious Party
Lovely Little Link Party
Kitchen Fun & Crafty Friday Link Party
Celebrate It Block Party
Flaunt It Friday
Craft Frenzy Friday
Friday Feature Link Party
Link Party Palooza
Brunch Party